
It’s not uncommon to have to resize/modify an image. However, if you frequently work with photographs received from the web, you will most likely find yourself altering them frequently.
Fortunately, practically every picture application has the option to resize photographs. This combines the two most famous tools, that are installed by default on every Windows computer viz Photos & Microsoft Paint.
However, there is a distinction to be made between shrinking a picture to make it smaller & resizing the picture to make it larger. Almost every software, including Photos & Paint, can modify the image without a problem. However, when you use such tools to enlarge a photograph, you may see that the picture loses a significant amount of quality.
Therefore, if you need to resize a picture up (to more than 100% of its initial dimensions) without it becoming pixelated and fuzzy, you will need to utilize software with an intelligent resizing tool, such as Adobe Photoshop.
However, if you need to resize a picture down or are willing to sacrifice picture quality, this is how to utilize Window’s built-in picture scaling capabilities.
Resize images Using the Photos App
Photos app is the primary photo viewer and editor tool in Windows. It can resize almost every picture type.
- Open Photos by double-clicking the picture file you wish to enlarge.
- When it is open, click on the three dots placed in the middle of the photos app, then select “Resize.”


- A little pop-up window will open, providing you 3 preset photo sizes. Choose one of these, or scroll down and select “Define custom measurements.”

- If you select custom sizes, a new menu will show up allowing you to specify the precise size of the picture. You may also specify the picture quality – higher quality images appear better however they have a larger file size.

If “Maintain aspect ratio” is selected, you simply need to modify the width or height, and all the other measurements will adjust to match.
- Set new measurements, then hit the “Save a resized copy” button.
Reduce image size using Microsoft Paint
- Launch Paint, which is normally found in the Start menu. However, If it is not there, put “Paint” into the Start menu search bar and click on the match when it shows up.
- Click File>Open, and then select the photo you wish to resize from the computer’s files.
- Click “Resize” on the “Home” section on top of the menu bar.

- The window “Resize and Skew” should display.

- Enter the picture size you wish to resize. After that, you can adjust the size by entering % (for example, “30% bigger”) or by entering the precise measurements you wish. If “Maintain aspect ratio” is selected, you just need to provide the vertical & horizontal dimensions and all the other measurements will be calculated automatically.
- To apply the modification, click “OK.
- Click File>Save As to save the revised version of a new picture.
Resize Image without Losing Quality by Image Resizer for Windows Developed by Tweaking Technologies: –
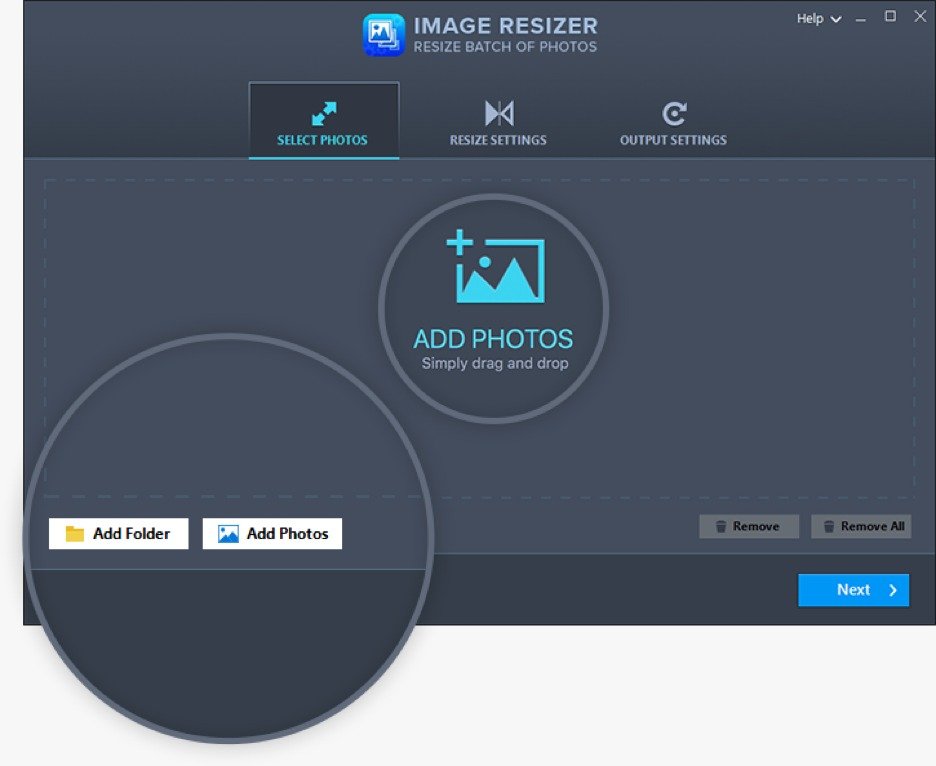
Image Resizer is a fantastic application for flipping, resizing, renaming, rotating, and altering the layout of several photographs at once. To resize photos without losing visual quality.
Picture Resizer helps you save time by providing different image scaling options. Adjust picture width and height regardless of the image format. Just apply specified settings to a complete batch of photographs. Simply drag & drop photos or just add the folder to Tweaking Technologies Image Resizer to change the image dimensions without compromising quality.
Image Resizer offers a variety of choices for altering image measurements, making things simple for consumers. You may either select from the predefined dimensions or enter unique proportions based on your needs. Image Resizer’s intelligent algorithms ensure that picture quality is not compromised, regardless of size.
Improper image orientation sometimes is a huge annoyance, especially for inexperienced photographers. Furthermore, pictures with incorrect alignment are a visual irritant. Image Resizer can automatically fix incorrect orientation. Furthermore, photos may be rotated anticlockwise/clockwise or turned over 180 ° to your preference.
Image Resizer converts the file type for photographs to any common image type of your choice whether it is an individual photo or a large collection of resized pictures. It can convert pictures too.JPG, .PNG, .JPEG, .GIF, .BMP, .TIF, .TIFF formats. This implies that Image Resizer could be used as a resizing application, and also as a file types converter for all the digital photographs.
There are more features in this tool that are useful to alter photos. This does not only allow you to resize images without sacrificing quality, in fact, it also allows you to change names at once and save them in nicely named subfolders.
There are various types of features in image resizers that are helpful for both novices and professionals.
Conclusion
In this blog, we have seen how to resize images without losing quality. There are built-in tools available in Windows that can do a normal alteration to the photos and save them for further use.
However, if you want to do more with photos then we recommend using Image Resizer which has various features to alter your photos.
Use these steps to resize multiple images and let us know your views in the comment section below.