
Today screen recording has become essential for various purposes. Whether you are a content creator, educator, gamer, or simply want to share something with your friends or colleagues, it helps.
Capturing computer screens enables the creation of engaging tutorials, recording gameplay, troubleshooting technical issues, and other things.
If you are looking for ways to record gameplay and stay ahead in this competitive market, you must learn how to record gameplay. This comprehensive guide walks you through various methods and tools to record your computer screen effortlessly.
Different Ways to Screen Record on Windows
The latest version of the Windows operating system comes equipped with built-in screen recording tools, which makes the process easy. However, it has certain limitations.
If you agree with me, you must look for a workaround. Whether you are looking for a workaround or want to learn how to use Windows built-in tool to record gameplay, we have got you covered.
Here we will explain how to record screens using Game Bar and Advanced Screen Recorder, one of the best tools to record screens on Windows. Here’s how to use them:
Method 1 – Using the Xbox Gaming Bar
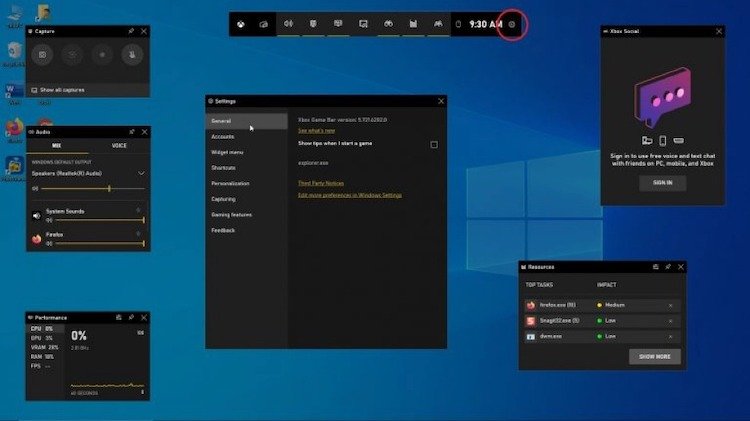
Many individuals aren’t aware of this, but Windows has a Gaming option in settings. It can be accessed by pressing Windows + I > Gaming.

Click on it to see if you can access the Game bar. Enable it to record gaming clips, screenshots, and broadcasting.

Also, you set keyboard shortcuts to launch the Game Bar, record the screen, take screenshots, record, and broadcast the game. You can even show a camera in broadcast and can record with or without audio.
To take screenshots, click on the camera icon and start recording.
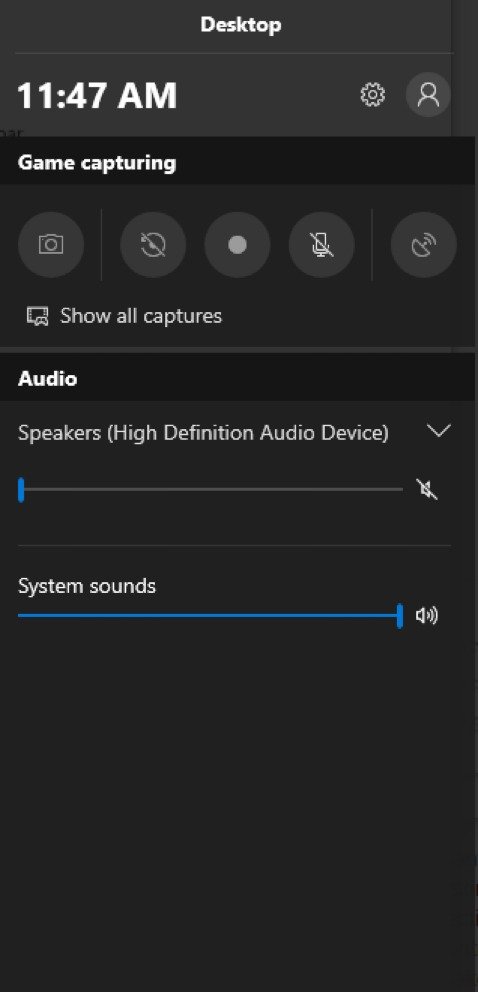
Alternatively, you can press Windows + G to launch the gaming bar. The window will show you various options if you use it without a game.
You can alter the settings and volume of your speakers and microphone. More features are accessible in the settings. Navigate to it to add your Xbox account to it.

Another exceptional feature is recording live. This implies that the built-in app will take pictures of the screen as you play the game.

To record the game or screen, press Win+Alt+R
5. To stop recording, Win +G and click the Red stop button.
Method 2 – Recording computer screen using Advanced Screen Recorder.
Advanced Screen Recorder is the ultimate and powerful tool that lets you record multiple screens, voiceovers, webcam overlay videos, and more. If you want to record your computer screen, you need an advanced screen recorder. This simple tool allows you to record selected areas or the entire screen. The tool offers a variety of area selection options.
- Full Screen.
- Select Region
- Select Window
- Webcam
Step 1. Download and install Advanced Screen Recorder from the official website.
Step 2. Launch the tool to record the computer screen, gameplay, or anything you do on your screen.
Step 3. The tool shows a tutorial screen for a better understanding of the tool. You can follow it through or can skip it.
Step 4. Select from the recording options.

Step 5. To record with audio, click the speaker icon and the microphone for audio input. You can record from both the microphone and system sound separately or simultaneously.
Step 7. Once settings are done, click the Record button to start recording the screen. To stop it click the Red button present on the mini toolbar.

Step 8. To save the recording, click the Red Square button.
To view the recording, click the Recordings tab > click the preview button > select the application and see the recorded video.

Here’s how to record your computer screen using a third-party tool and Game Bar on your Windows. The best way to record your entire screen selected windows, or even your screen while using your webcam and overlays is to use Advanced Screen Recorder.
The tool allows you to record HD-quality video at up to 120 FPS frame rates. Audio files are recorded separately; you can save videos in different formats.
Using these two ways, you can easily record the screen on Windows. In addition to this, for better results, try the tips explained below:
- Choose the right settings.
- Decide the screen resolution you want before recording the screen. The higher it is better the quality. However, remember a recording done with higher resolution has a large file size.
- Select the appropriate frame rate. 30 frames per second (fps) is generally sufficient to begin with.
- Choose the type of audio you want in your recording. Adjust the audio levels to avoid distortion.
- Plan Your Content and ensure you know what you want to record before hitting the record button.
- Remove clutter from the desktop.
- Use keyboard shortcuts
- Edit recording if necessary before uploading.
With the help of these tips, you can have a quality video recording saved on your PC. We hope you enjoyed reading this article and that you will try out the tool for recording single and multiple screens with or without sound.
Do let us know which method you prefer. If you want to record a screen without any manual intervention, try Advanced Screen Recorder, as it allows scheduling the recording.
Also, you can trim the recording and record both the system and audio from the microphone. The screen recording even allows adding a watermark which will add a security layer to your video.